A 6-foot privacy fence in Tampa collapsed 14 months after installation. Not from a hurricane. Not from rot. The contractor had spaced his 4x4 posts at 10 feet on center, used 24-inch footings in sandy soil, and called it a day. The homeowner sued. The contractor's insurance paid out $11,400. The fix required tearing out 187 linear feet of fence and starting over.
That job took three days to install the first time. The rebuild took four.
Post spacing is the single most consequential decision you make on a fence job. Get it wrong and everything downstream fails: panels sag, rails bow, gates bind, and your phone rings six months later. Get it right and the fence stands for 20+ years with zero callbacks.
This guide covers exact spacing specs for every major fence type, post depth requirements by height, soil adjustments, and the mistakes that cost contractors money. Bookmark it. You'll use it.
Chain Link Fence Post Spacing
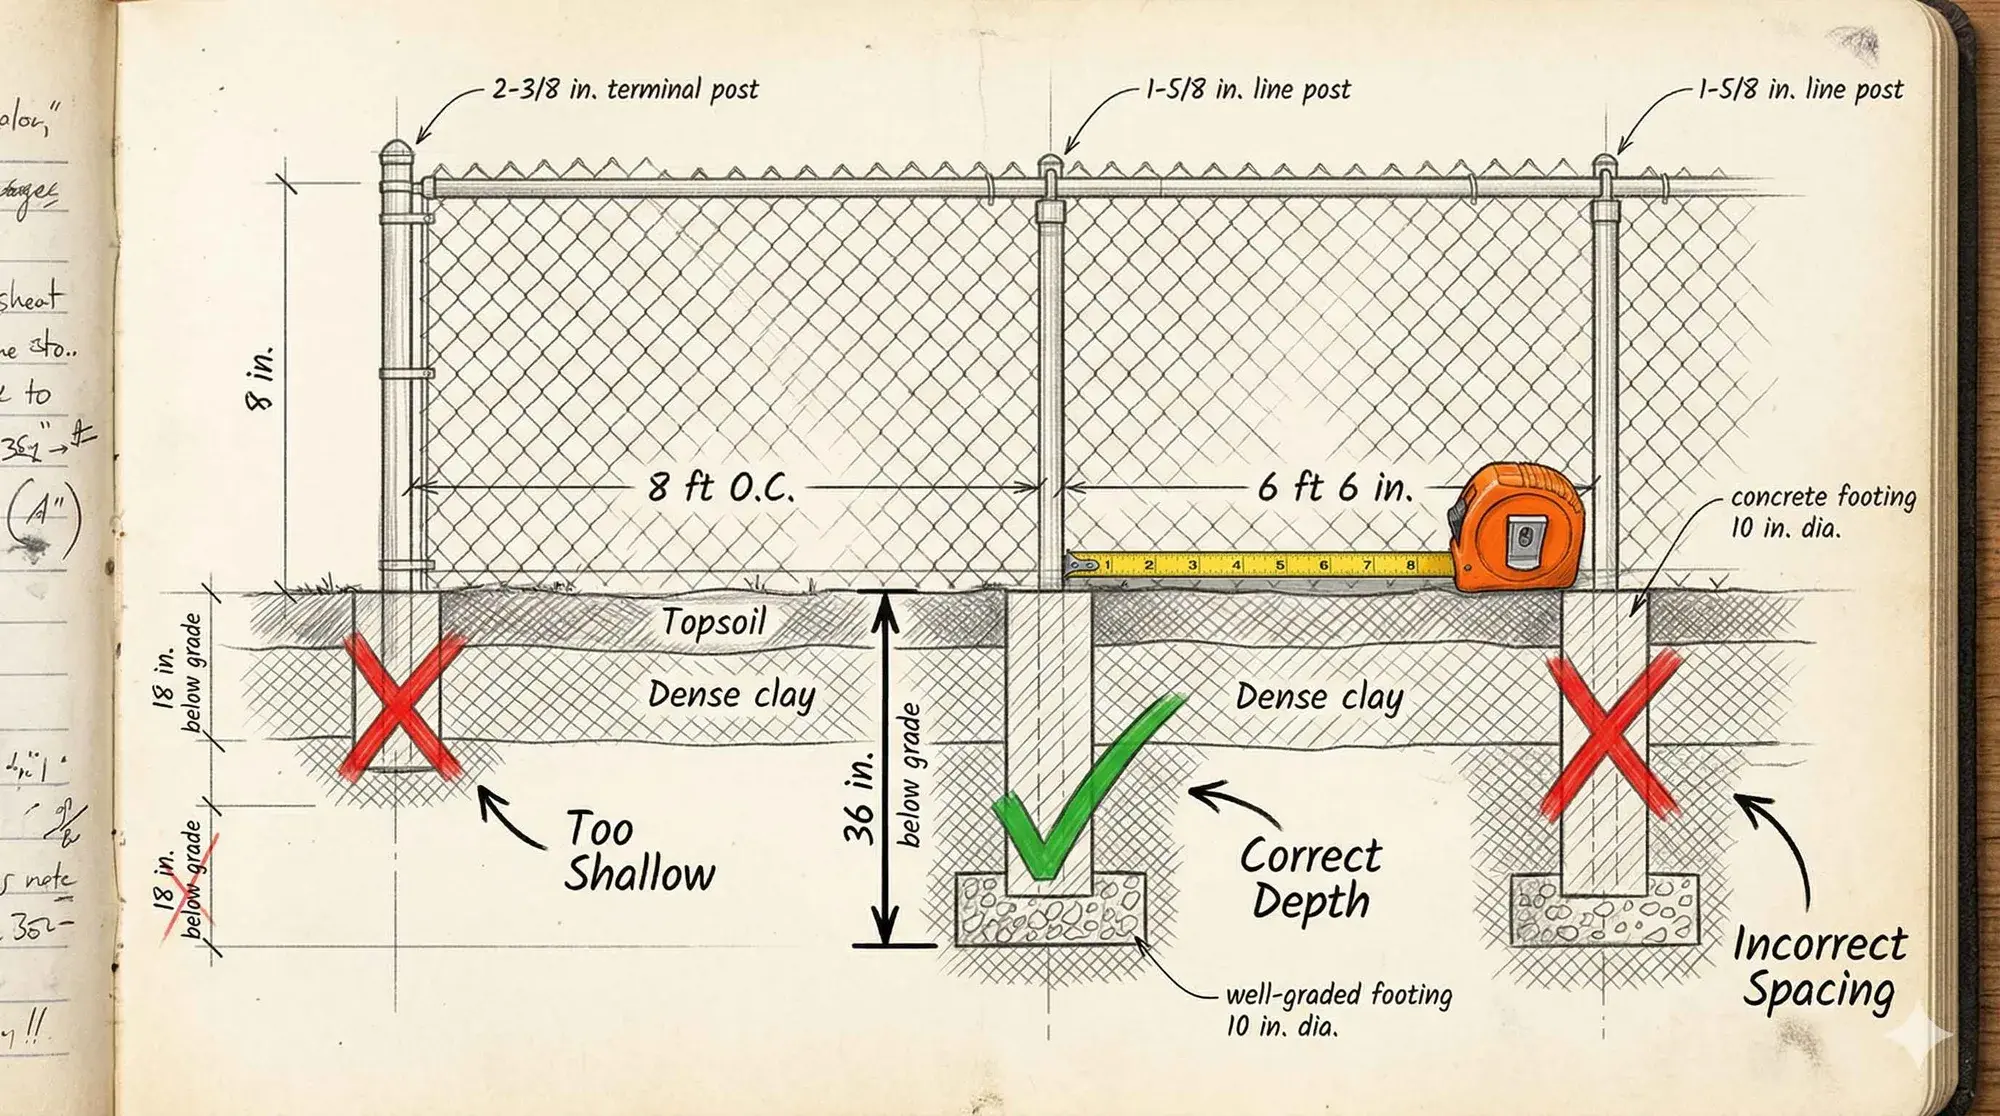
Chain link is the most forgiving fence type when it comes to spacing, but that doesn't mean you can wing it. The mesh transfers wind load across the entire run, so your terminal posts (ends, corners, gates) take the brunt of lateral force. Line posts simply keep the top rail straight and the mesh upright.
Standard line post spacing for residential chain link fence is 10 feet on center. Commercial and industrial jobs often tighten that to 8 feet. Here's the full breakdown by fence height.
Chain Link Post Spacing by Fence Height
| Fence Height | Line Post Spacing (OC) | Line Post Diameter | Terminal Post Diameter | Terminal Post Wall Thickness |
|---|---|---|---|---|
| 4 ft (Residential) | 10 ft | 1-5/8" | 2" | .065" (Sch 20) |
| 5 ft (Residential) | 10 ft | 1-5/8" | 2" | .065" (Sch 20) |
| 6 ft (Residential) | 10 ft | 2" | 2-1/2" | .065" (Sch 20) |
| 6 ft (Commercial) | 8 ft | 2-1/2" | 3" | .065" (Sch 40) |
| 8 ft (Commercial) | 8 ft | 2-1/2" | 3" | .095" (Sch 40) |
| 10 ft (Industrial) | 8 ft | 2-7/8" | 4" | .095" (Sch 40) |
| 12 ft (High Security) | 8 ft | 3" | 4" | .120" (Sch 80) |
Corner and Gate Post Rules
Corner posts take force from two directions simultaneously. Always use terminal-grade posts at every corner, regardless of fence height. For gates, your terminal posts must be even heavier because the gate hardware creates a constant lever arm pulling the post toward the opening.
- Single walk gates (up to 4 ft wide): Use 2-1/2" terminal posts minimum
- Double drive gates (up to 12 ft wide): Use 3" terminal posts, or 4" for gates over 16 ft
- Sliding gates (any width): Use 4" terminal posts with 36-inch concrete footings
- Corner posts: Same diameter as terminal posts on that run, but add 6 inches to the footing depth
One detail that gets missed on chain link: the last line post before a terminal post should be no more than 8 feet away, even on a 10-foot spacing layout. That tighter gap at the end prevents the mesh from pulling loose at the terminals where tension is highest.
Wood Fence Post Spacing
Wood fences are less forgiving than chain link. There's no mesh distributing load across the run. Each section is an independent panel held up by two posts, and if those posts are too far apart, the rails sag under the weight of the pickets. A standard 6-foot dog-ear privacy fence with 5/8" x 6" pickets weighs about 12 to 15 pounds per linear foot. That's 96 to 120 pounds of dead weight per 8-foot section, not counting wind load.
The industry standard for wood fence post spacing is 8 feet on center for most styles. But style, picket weight, and rail configuration change that number.
Wood Fence Post Spacing by Style
| Fence Style | Post Spacing (OC) | Post Size | Number of Rails | Notes |
|---|---|---|---|---|
| Privacy (dog-ear, flat top) | 8 ft | 4x4 | 3 (top, middle, bottom) | Use 3 rails on fences 6 ft+ |
| Picket (3-4 ft) | 8 ft | 4x4 | 2 | Lighter load allows 2 rails |
| Board-on-Board | 6-8 ft | 4x4 | 3 | Overlapping boards add 30-40% weight |
| Shadowbox | 8 ft | 4x4 | 3 | Alternating boards reduce wind load |
| Split Rail (2-rail) | 8 ft | 5" line posts | 2 | Mortise-and-tenon joints |
| Split Rail (3-rail) | 8 ft | 5" line posts | 3 | Add wire mesh for livestock |
| Horizontal Slat (modern) | 6 ft | 4x4 or 6x6 | N/A (horizontal boards) | Shorter spans prevent board sag |
Why 8 Feet and Not 10
Lumber comes in 8-foot lengths. A 2x4 rail spanning 8 feet between posts uses the full board with zero waste. Push that to 10 feet and you're buying 12-foot lumber, cutting 2 feet of scrap per rail, and paying 35-50% more per board foot. The math never works.
There's also a structural reason. A 2x4 SPF (spruce-pine-fir) rail spanning 10 feet will deflect about 3/8" under its own weight plus a moderate wind load of 15 PSF. At 8 feet, that deflection drops to under 1/8". You can feel the difference when you push on the fence with your hand.
When to Go Shorter Than 8 Feet
Board-on-board and horizontal slat fences benefit from 6-foot spacing. Board-on-board panels weigh 30-40% more than standard privacy because of the overlapping pickets. A 6-foot board-on-board section at 6 feet tall weighs roughly 130 to 155 pounds. At 8-foot spacing, that climbs to 175 to 200 pounds, and you'll see the rails bow within two years.
Horizontal fences are even more demanding. Each horizontal board spans the full distance between posts with no rail support underneath. At 8 feet, a 1x6 cedar board will develop a visible sag within 6 months. Drop to 6 feet and the board stays straight for the life of the fence.
Vinyl Fence Post Spacing
Vinyl fence spacing is dictated by panel width, not general rules of thumb. Unlike wood, vinyl panels are manufactured to specific dimensions. Your post spacing has to match the panel, plus the width of the post and any routed slots or brackets.
Most vinyl fence panels come in 6-foot or 8-foot widths. The actual on-center post spacing is the panel width plus the width of one post (since each panel sits between two posts, and adjacent panels share a post).
Vinyl Fence Post Spacing by Panel Size
| Panel Width | Fence Height | Post Size | On-Center Spacing | Post Wall Thickness |
|---|---|---|---|---|
| 6 ft panel | 4 ft | 4" x 4" | 72-3/4" (approx. 6 ft 3/4") | .100" |
| 6 ft panel | 5 ft | 4" x 4" | 72-3/4" | .100" |
| 6 ft panel | 6 ft | 5" x 5" | 73" | .115" |
| 8 ft panel | 4 ft | 4" x 4" | 96-3/4" | .100" |
| 8 ft panel | 5 ft | 5" x 5" | 97" | .115" |
| 8 ft panel | 6 ft | 5" x 5" | 97" | .130" |
| 8 ft panel | 8 ft | 5" x 5" (aluminum reinforced) | 97" | .150" |
Aluminum Inserts Are Non-Negotiable
Every vinyl fence post 5 feet tall or higher needs an aluminum insert. Period. Vinyl alone has a flexural modulus of about 400,000 PSI. An aluminum-reinforced post jumps that to over 2,000,000 PSI. Without the insert, a 6-foot vinyl privacy panel in a 50 MPH gust can snap the post at grade level.
The insert should extend from 2 inches below grade to within 4 inches of the post cap. For a 6-foot fence with a 102-inch total post length (36 inches in the ground, 66 inches above), you need a 96-inch aluminum insert. Don't cut corners on this. The insert costs $8-12 per post. A warranty callback costs $300+.
Vinyl Spacing Tolerances
Vinyl panels are rigid and manufactured to exact dimensions, which means your post spacing tolerance is tight. You have about 1/4 inch of play in most routed-post systems and 1/2 inch in bracket systems. If your posts are even 1 inch too far apart, the panel won't seat into the routed channels. Too close and you can't get the panel in at all.
Measure twice. Set your first two posts, test-fit a panel, then use that confirmed spacing for the rest of the run. String lines aren't enough for vinyl. You need a spacing jig or a cut piece of lumber at the exact panel width.
Ornamental and Aluminum Fence Post Spacing
Ornamental aluminum and steel fences come in pre-assembled panels, similar to vinyl. The panels are manufactured in standard widths of 6 feet or 8 feet, and your post spacing must match the panel plus the post width.
Most ornamental aluminum panels use 2" x 2" posts for residential grades (Grade B) and 2-1/2" x 2-1/2" posts for commercial grades (Grade C). Industrial grade (Grade A) uses 3" x 3" posts.
| Grade | Panel Width | Fence Height | Post Size | On-Center Spacing | Picket Spacing |
|---|---|---|---|---|---|
| Residential (B) | 6 ft | 4 ft | 2" x 2" | 72" + post width | 3-5/8" (meets pool code) |
| Residential (B) | 6 ft | 5 ft | 2" x 2" | 72" + post width | 3-5/8" |
| Commercial (C) | 8 ft | 6 ft | 2-1/2" x 2-1/2" | 96" + post width | 3-1/2" to 4" |
| Industrial (A) | 8 ft | 8 ft | 3" x 3" | 96" + post width | 3-1/2" |
Pool Code and Picket Spacing
If you're installing ornamental fence around a pool, the International Building Code (IBC) and most local codes require that the space between pickets be no more than 4 inches. Most residential-grade aluminum panels come with 3-5/8" picket spacing to meet this requirement with margin. But always verify with your local AHJ (Authority Having Jurisdiction). Some municipalities, like parts of Miami-Dade County, require 3-1/2" maximum.
The 4-inch rule applies to the gap between pickets, not on-center picket spacing. A 5/8" square picket on 4-1/4" centers leaves a 3-5/8" gap. That passes. The same picket on 4-3/4" centers leaves a 4-1/8" gap. That fails.
Racking vs. Stair-Stepping
On sloped ground, ornamental panels can either rack (the pickets pivot to follow the grade) or stair-step (panels stay level with gaps underneath). Rackable panels typically allow up to a 12-inch rise over a 6-foot run. Beyond that slope, you need to stair-step or order custom-raked panels.
When stair-stepping, your post spacing stays the same, but you need to account for the vertical offset at each post. Each step drops the panel by a fixed increment, usually 3 to 6 inches. On a steep grade, this means your posts alternate between two different above-grade heights.
Post Depth Guide
The general rule is simple: one-third of the total post length goes underground. A 6-foot fence with an 8-foot post means 2 feet in the ground and 6 feet above. But that's a starting point, not a final answer. Frost lines, soil type, wind exposure, and fence type all adjust that number.
Post Depth by Fence Height
| Fence Height | Total Post Length | Minimum Depth (Standard Soil) | Minimum Depth (Frost Line Areas) | Concrete Footing Diameter |
|---|---|---|---|---|
| 3 ft | 5 ft | 18" | Below frost line + 6" | 8" |
| 4 ft | 6 ft 6 in | 24" | Below frost line + 6" | 10" |
| 5 ft | 7 ft 6 in | 30" | Below frost line + 6" | 10" |
| 6 ft | 9 ft | 36" | Below frost line + 6" | 12" |
| 8 ft | 12 ft | 48" | Below frost line + 6" | 12" |
| 10 ft | 14 ft | 48-54" | Below frost line + 6" | 14" |
| 12 ft | 16 ft | 54-60" | Below frost line + 6" | 16" |
Frost Line Reference
If you're working anywhere that freezes, your post footing must extend below the frost line. Otherwise, the freeze-thaw cycle will heave the post out of the ground over 2 to 3 winters. Here are frost depths for common regions:
- Southern states (FL, TX coast, LA, AZ): 0-6 inches, frost depth rarely a factor
- Mid-Atlantic (NY, NJ, PA, MD): 36-42 inches
- Midwest (OH, IL, IN, MI): 36-48 inches
- New England (MA, CT, VT, NH, ME): 48-60 inches
- Upper Midwest (MN, WI, ND): 60-72 inches
In frost-prone areas, your post depth is whichever is greater: the one-third rule or 6 inches below the frost line. For a 6-foot fence in New England, the one-third rule gives you 36 inches. But the frost line may be 48 inches. So you go to 54 inches (48 + 6), which means you need a 10-foot 6-inch post, not a 9-foot post.
Concrete vs. Gravel Footings
Concrete is the default for a reason: it locks the post in place and resists lateral movement. Use a fast-setting concrete like Quikrete or Sakrete, mixed to about 40-50 pounds per post hole for a 4x4 post in a 10-inch diameter hole at 30-inch depth.
Gravel footings (compacted 3/4" crushed stone) work well for wood posts because they allow drainage and reduce rot at the base. Pack 4-6 inches of gravel at the bottom of the hole, set the post, then fill with alternating layers of gravel and compaction, 4 inches at a time. This method is common in the Pacific Northwest where annual rainfall exceeds 40 inches and wood post rot is a major concern.
Never use gravel for vinyl or aluminum posts. These posts rely entirely on the footing for structural support since they have no weight of their own to resist wind. Concrete is required.
Soil Conditions and When to Adjust Spacing
Not all dirt is the same, and your spacing has to account for what's underground. A post set 36 inches deep in dense clay is structurally equivalent to a post set 48 inches deep in loose sand. Soil bearing capacity changes everything.
Soil Types and Their Impact
Clay soil (bearing capacity: 2,000-4,000 PSF). Dense clay holds posts extremely well. You can use standard spacing and standard depth with confidence. The downside: clay expands when wet and contracts when dry. In areas with seasonal drought, this expansion-contraction cycle can loosen footings over time. Solution: oversize your footing diameter by 2 inches (use a 12-inch hole instead of 10-inch) to give the concrete more surface area to resist movement.
Sandy soil (bearing capacity: 1,000-2,000 PSF). Sand drains well but provides poor lateral support. Posts in sandy soil need 25-30% more depth than the standard one-third rule. For a 6-foot fence, that means going from 36 inches to 45-48 inches. You should also increase footing diameter to 12-14 inches and consider reducing post spacing from 8 feet to 6 feet for wood fences.
Loam (bearing capacity: 1,500-3,000 PSF). The ideal soil. Standard spacing and depth work as published. Loam compacts well, drains adequately, and provides consistent lateral support across seasons.
Rocky soil. Rock provides excellent bearing capacity (often 8,000+ PSF), but you may not be able to dig to full depth. If you hit bedrock at 24 inches on a 6-foot fence, you have two options: anchor the post to the rock with expansion bolts and a steel bracket, or increase the footing diameter to 16-18 inches to compensate for the shallow depth.
Fill dirt or recently graded soil. This is the worst-case scenario. Fill dirt hasn't had time to compact naturally, and its bearing capacity can be as low as 500 PSF. If you're installing fence on fill dirt less than 2 years old, go deeper by 50%, use wider footings, and tighten your spacing by at least 2 feet. A 6-foot privacy fence on fill dirt should be on 6-foot centers with 48-inch post depth minimum.
High Wind Zones
In areas rated for 110+ MPH wind speeds (coastal Florida, Gulf Coast, Outer Banks), solid privacy fences act like sails. A 6-foot privacy fence in a 110 MPH wind generates approximately 32 PSF of wind load. Over an 8-foot section, that's 1,536 pounds of lateral force on two posts.
For high-wind zones, tighten post spacing to 6 feet on solid fences, increase post depth by 25%, and use concrete footings with a bell shape (wider at the bottom) to resist pullout. Alternatively, use a shadowbox or semi-privacy design that lets 30-40% of wind pass through, cutting the effective load nearly in half.
Common Mistakes Contractors Make
These are the errors that lead to callbacks, warranty claims, and lost referrals. Every one of them is avoidable.
1. Spacing Posts Before Checking the Property Line
You lay out your posts at perfect 8-foot intervals across 200 feet, only to discover the property line is at 197 feet. Now your last section is 5 feet wide. That looks terrible. Always measure the total run first, then divide to find a spacing that gives you equal sections. For a 197-foot run, 24 sections at 8 feet 2-1/2 inches each looks far better than 24 sections at 8 feet plus one stubby section at 5 feet.
2. Not Accounting for Post Width
An 8-foot on-center spacing with 4x4 posts (actual size 3-1/2" x 3-1/2") gives you a clear span of 92-1/2 inches between posts, not 96 inches. If you're using pre-cut 8-foot panels, they won't fit. Panels are typically manufactured at 92-1/4" to 93" wide to account for this. But if you're building from individual pickets and rails, your rail length is 92-1/2", not 96".
3. Setting All Posts in a Straight Line Before Plumbing
Some crews dig all their holes, set all posts in concrete, and then come back to plumb and brace them. By the time they get to post #15, the concrete on post #1 has already kicked. If that post is 1/2 inch out of plumb, it stays that way. Set, plumb, and brace each post individually before moving to the next, or work in groups of 3-4 posts max and come back to plumb before the concrete sets (you have about 15-20 minutes with fast-set concrete).
4. Ignoring Grade Changes
On sloped terrain, your post spacing should be measured along the ground, not horizontally. A 10% grade means a horizontal 8-foot measurement is actually 8 feet and 1/2 inch along the slope. At 20% grade, it's 8 feet 2 inches. This matters when you're fitting pre-made panels. On steep grades, measure along the slope and adjust panel sizing accordingly.
5. Using Undersized Posts for Gate Sections
A gate swings. Every swing puts a dynamic load on the hinge-side post that a line post never experiences. A single walk gate on a 4x4 post will loosen that post within 2-3 years, guaranteed. Gate posts should be 6x6 for wood fences, or one pipe size up for metal. Set them 6 inches deeper than line posts and use 50% more concrete in the footing.
6. Crowning the Concrete Above Grade
Mounding concrete above the soil line around a wood post traps moisture against the post right at grade level, which is the #1 rot zone. Always finish the concrete 2-3 inches below grade and slope it away from the post so water sheds outward. Then backfill with soil or gravel to grade.
7. Not String-Lining the Run
Eyeballing post alignment is not a strategy. Set your two end posts first, run a mason's string line between them at 6 inches above grade, and set every intermediate post to that line. Check the string for sag on runs longer than 100 feet, and add a mid-run reference post if needed. A fence that's off by even 1 inch over 100 feet is visible to the naked eye.
8. Forgetting Expansion Gaps on Vinyl
Vinyl expands and contracts with temperature. A 6-foot vinyl panel can grow up to 3/8" in length between winter and summer. If you set your posts tight to the panel in cold weather, the panel will buckle when it heats up. Always leave 1/4" of clearance on each side of the panel. In hot climates (Arizona, Nevada, South Texas), increase that to 3/8".
FAQ
What is the standard fence post spacing for a residential fence?
For wood and chain link fences, the standard spacing is 8 to 10 feet on center. Wood fences typically use 8-foot spacing to match standard lumber lengths, while residential chain link uses 10-foot line post spacing. Vinyl and aluminum fences use spacing that matches the manufactured panel width, usually 6 or 8 feet plus the post width.
Can I space fence posts 10 feet apart for a wood fence?
You can, but you shouldn't. Standard 2x4 rails spanning 10 feet will sag under the weight of pickets, especially on 6-foot privacy fences. You'd need to upgrade to 2x6 rails or add a mid-span support bracket to prevent deflection. Sticking with 8-foot spacing uses standard lumber efficiently and eliminates sag.
How deep should fence posts be set in the ground?
The general rule is one-third of the total post length underground. For a 6-foot fence, that means 36 inches of depth using a 9-foot post. In areas with frost, posts must extend at least 6 inches below the frost line, which may require deeper holes than the one-third rule. Sandy or loose soil also calls for 25-30% additional depth.
Do corner posts need to be spaced differently than line posts?
Corner posts don't change the spacing of the fence sections on either side of them. Each run maintains its standard on-center spacing. However, corner posts must be heavier-gauge or larger-diameter than line posts because they absorb lateral force from two perpendicular directions. Set them 6 inches deeper and use 50% more concrete.
How do I handle uneven spacing at the end of a fence run?
Measure the total run before setting any posts. Divide the length by your target spacing to find the number of sections. If it doesn't divide evenly, adjust the spacing slightly across all sections rather than leaving one short section at the end. For example, a 74-foot run works better as 9 sections at 8 feet 2-3/4 inches each than 9 sections at 8 feet with one 2-foot section.
Build It Right the First Time
Correct post spacing isn't complicated, but it demands attention to the specifics of every job: fence type, height, soil conditions, wind exposure, and grade. The tables in this guide give you the numbers. Your experience on the job site tells you when to adjust them.
NMI Fence manufactures wholesale chain link, vinyl, wood, and ornamental fence products for contractors across the Northeast and beyond. Whether you're pricing out a 200-foot residential run or a commercial perimeter job, NMI supplies the posts, panels, rails, and hardware you need at wholesale pricing. Visit nmifence.com or call to set up a contractor account and get pricing on your next project.