Chain Link Fence Installation: The Complete Contractor's Guide
A 2-person crew can install 150 linear feet of 4-foot residential chain link fence in a single day. A 3-person crew can push that to 200+ feet if the terrain cooperates. But speed only matters when the installation is right. A fence that leans 2 degrees off plumb, settles 3 inches in the first year, or has fabric that sags between posts is a callback waiting to happen. This guide covers every step of a chain link fence installation, from layout to final tie wire, with the specific measurements, tool requirements, and techniques that separate professional-grade work from weekend-warrior results.
Tools and Materials Checklist
Before you start any chain link job, confirm you have every tool and material on-site. A missing tension bar or a forgotten come-along costs you 45 minutes in drive time. Here is the complete list.
Tools Required
| Tool | Purpose | Notes |
|---|---|---|
| String line (200+ ft) | Layout and alignment | Mason's line, not twine (twine stretches) |
| Tape measure (100 ft) | Post spacing, height checks | Long tape for layout, 25 ft tape for detail work |
| Post hole digger (manual or power) | Digging post holes | Power auger saves 60-70% of digging time |
| Level (48" and torpedo) | Plumbing posts | 48" level for terminal posts, torpedo for line posts |
| Come-along (fence stretcher) | Stretching fabric | Minimum 2-ton rated, 6 ft pull |
| Tension bar | Connecting fabric to terminal posts | Must match fence height (minus 2") |
| Fence pliers | Cutting tie wire, bending, pulling | Multi-function fence pliers, not standard pliers |
| Pipe cutter or hacksaw | Cutting top rail to length | Pipe cutter produces cleaner cuts |
| Socket wrench set | Tightening brace bands and carriage bolts | 7/16" and 1/2" most common sizes |
| Wheelbarrow and mixing hoe | Mixing concrete | Or use a portable mixer for jobs over 150 LF |
| Tie wire spinner (optional) | Speeding up tie wire attachment | Saves 30-40% on fabric attachment time |
| Marking paint or stakes | Marking post locations | Fluorescent paint for visibility on soil |
Materials Required
The exact quantities depend on project length, height, and gate count. The table below covers materials needed per 100 linear feet for common fence heights, assuming 10-foot post spacing and one walk gate.
| Material | 4 ft Height (per 100 LF) | 5 ft Height (per 100 LF) | 6 ft Height (per 100 LF) |
|---|---|---|---|
| Terminal posts (end, corner, gate) | 2 + corners + 2 per gate | 2 + corners + 2 per gate | 2 + corners + 2 per gate |
| Terminal post diameter | 2-3/8" OD x 0.065 wall | 2-3/8" OD x 0.065 wall | 2-3/8" OD x 0.065 wall |
| Terminal post length | 7 ft (36" in ground + 48" + 2" above) | 8 ft (36" in ground + 60" + 2" above) | 9 ft (36" in ground + 72" + 2" above) |
| Line posts | 9 (at 10 ft spacing) | 9 | 9 |
| Line post diameter | 1-5/8" OD x 0.065 wall | 1-5/8" OD x 0.065 wall | 2" OD x 0.065 wall |
| Line post length | 6.5 ft | 7.5 ft | 8 ft |
| Top rail (1-3/8" OD) | 105 LF (5% waste) | 105 LF | 105 LF |
| Chain link fabric (11 ga galv) | 100 LF roll x 48" wide | 100 LF roll x 60" wide | 50 LF rolls x 72" wide (x2) |
| Tension bars | 1 per terminal post | 1 per terminal post | 1 per terminal post |
| Tension bands | 3 per terminal post | 4 per terminal post | 4 per terminal post |
| Brace bands | 2 per terminal post | 2 per terminal post | 2 per terminal post |
| Rail ends (pressed steel) | 2 per terminal post | 2 per terminal post | 2 per terminal post |
| Loop caps (line post) | 9 | 9 | 9 |
| Post caps (terminal post) | All terminal posts | All terminal posts | All terminal posts |
| Tie wires (aluminum) | ~100 (1 per foot + top rail ties) | ~120 | ~140 |
| Concrete (60 lb bags) | 2 bags per post | 2 bags per post | 3 bags per post |
| Walk gate (single, 42" wide) | 1 gate frame + hardware | 1 gate frame + hardware | 1 gate frame + hardware |
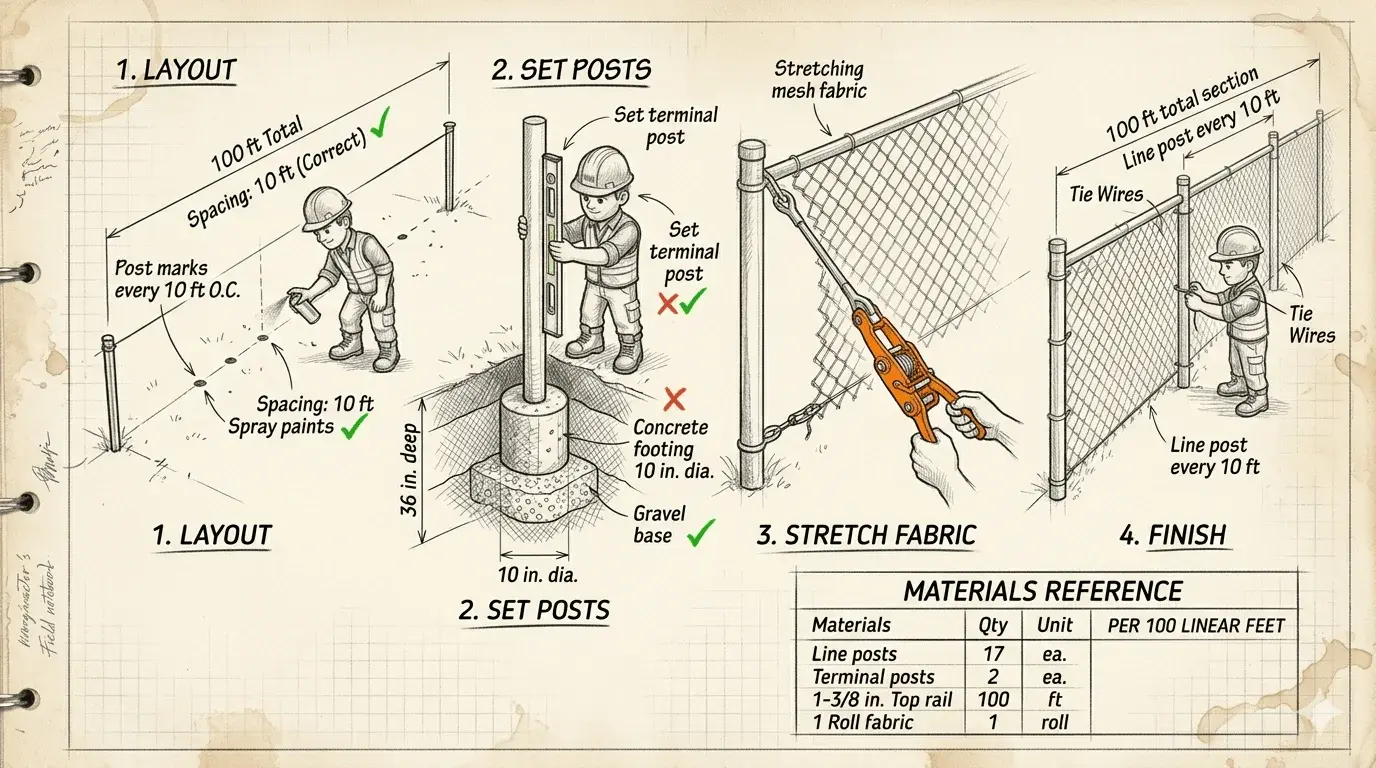
For a typical 100-linear-foot, 4-foot residential install with 2 end posts, 1 corner, 1 walk gate, and 9 line posts, you need approximately 13 posts, 105 feet of top rail, 100 feet of fabric, 24 bags of concrete (60 lb), and roughly 200 assorted fittings. Total material weight: approximately 1,200-1,500 pounds. Make sure your truck can handle it.
Step 1: Layout and Measuring
The String Line Method
Accurate layout is the foundation of every straight fence. The string line method is the industry standard, and skipping it is the fastest path to a crooked fence.
Start by identifying your terminal post locations. Terminal posts go at every end point, every corner, and both sides of every gate opening. Drive a stake at each terminal location. If you are working from a survey, verify the property pins with a metal detector. A fence installed 6 inches over the property line is a fence you are tearing out and reinstalling for free.
Run a mason's string line between terminal stakes, pulled taut and tied at a consistent height (36 inches is typical working height). Check the string against any known structures (house wall, sidewalk edge, existing fence) to verify alignment. A string line that looks straight to your eye may bow 2-3 inches over 100 feet. Sight down the line from one end. Any deviation from perfectly straight is visible at distance.
With the string line set, measure and mark your line post locations. Standard spacing is 10 feet on-center for residential chain link. For commercial or taller fences (8-12 feet), reduce spacing to 8 feet on-center to prevent top rail deflection and fabric sag. Mark each line post location with spray paint or a small stake, measuring from one terminal point along the string line.
At corners, the string line changes direction. Set a stake at the exact corner point. The terminal corner post sits at this location. Run a second string line from the corner stake to the next terminal point. Verify the angle with a framing square if the corner is intended to be 90 degrees. On long runs, verify the diagonal measurement (Pythagorean theorem: a 30-foot run and a 40-foot run should produce a 50-foot diagonal for a true 90-degree corner).
Gate Opening Measurement
A standard walk gate frame is 42 inches wide and requires a 44-inch clear opening between gate posts (1 inch clearance on each side for hinges and latch hardware). A double drive gate for vehicle access is typically 10-12 feet wide and requires a 10-foot-2-inch to 12-foot-2-inch opening. Measure the opening size you need, add the clearance, and set your gate terminal posts accordingly. Mark both gate post locations before you start digging.
Step 2: Post Hole Digging
Post hole dimensions depend on fence height and post type. These are the minimum specifications for residential chain link installations in stable soil. Sandy, clay, or high-water-table soils may require larger holes or deeper footings.
| Post Type | 4 ft Fence | 5 ft Fence | 6 ft Fence | 8 ft Fence |
|---|---|---|---|---|
| Terminal post hole diameter | 8" | 8" | 10" | 12" |
| Terminal post hole depth | 30" | 33" | 36" | 42" |
| Line post hole diameter | 6" | 6" | 8" | 10" |
| Line post hole depth | 24" | 27" | 30" | 36" |
| Gate post hole diameter | 10" | 10" | 12" | 12" |
| Gate post hole depth | 30" | 33" | 36" | 42" |
The general rule: dig to a depth equal to 1/3 the total post length plus 3 inches for a gravel base. The gravel base (3 inches of compacted pea gravel or crushed stone) provides drainage below the concrete footing and prevents the post from sitting in standing water, which accelerates corrosion at the ground line.
A power auger with a 6-inch or 8-inch bit will dig a post hole in 30-60 seconds in average soil. Manual post hole diggers take 5-10 minutes per hole. On a 100-linear-foot job with 13 posts, the power auger saves approximately 60-90 minutes. On a 300-foot commercial job with 35+ posts, the auger saves an entire day. Rent one if you do not own one. The $75-$150 daily rental pays for itself on any job over 80 feet.
Call 811 at least 48 hours (2 full business days) before digging. Utility locates are free, required by law in all 50 states, and take 2-3 business days to complete. Hitting a gas line costs $5,000-$50,000 in repairs and fines. Hitting a fiber-optic cable costs $10,000-$25,000. Neither is covered by your liability insurance if you failed to call for locates.
Step 3: Setting Terminal and Line Posts
Terminal Posts First
Always set terminal posts (end posts, corner posts, gate posts) first and let them cure before setting line posts. Terminal posts carry the tension load from the stretched fabric. They must be plumb, at the correct height, and fully cured before you hang anything on them.
Drop 3 inches of pea gravel into the bottom of each terminal post hole. Set the post in the hole. Check plumb with a 48-inch level on two adjacent sides (90 degrees apart). A post that is plumb on one face but leaning on the perpendicular face is not plumb. Check both.
Terminal post height above grade: fence height plus 2 inches. A 4-foot fence gets terminal posts at 50 inches above grade. A 6-foot fence gets terminal posts at 74 inches. This extra 2 inches accounts for the post cap and provides clearance above the top rail.
Mix concrete to a thick, pourable consistency (not soupy). Pour around the post, maintaining plumb as you fill. Crown the concrete at grade level, sloping away from the post at approximately 15-20 degrees. This crown sheds water away from the post and prevents pooling at the base. Do not mound concrete above grade because water will pool against the post instead of draining away.
Cure time: standard concrete mix reaches working strength (able to support lateral load from fabric tension) in 24-48 hours at 70 degrees Fahrenheit. Fast-setting concrete reaches working strength in 20-40 minutes. On residential jobs where you are stretching fabric the same day, fast-setting concrete is worth the premium ($1-$2 more per bag). On multi-day commercial jobs, standard mix is fine because you are setting posts on Day 1 and stretching on Day 2.
Brace Bands and Fittings on Terminal Posts
Before the concrete sets, slide the following fittings onto each terminal post from the top (they cannot be added after the post cap is installed):
- Tension bands: 3 per terminal post for 4-foot fence, 4 per terminal post for 5-foot and 6-foot fence. Space them evenly from top to bottom. These hold the tension bar that anchors the fabric edge.
- Brace bands: 1 at the top for the top rail connection, 1 near the bottom if you are using a bottom tension wire. Position the top brace band so the rail end fitting will sit approximately 2-3 inches below the top of the post.
- Post cap: After all bands are in position, tap the post cap (dome or barbed) onto the top of the post.
Tighten all bands finger-tight only at this stage. You will make final adjustments after the top rail is installed and before you stretch the fabric.
Line Posts
With terminal posts set and the string line re-established between them, set line posts in sequence. Line posts are simpler: they do not carry tension bands or brace bands (the top rail passes through a loop cap on top). Set each line post in its hole, check plumb, pour concrete, and crown.
Line post height: the top of the line post should be approximately 2 inches below the top of the terminal posts. This positions the loop cap at the correct height for the top rail to pass through level. If your terminal posts are at 50 inches (for a 4-foot fence), line posts should be at 48 inches above grade.
On sloped terrain, line posts step down to follow the grade. The top rail will slope between terminal posts, and the fabric will follow the top rail. Keep every line post plumb (vertical), even on a slope. Do not angle the line posts to match the slope. The fabric accommodates the grade change; the posts must remain vertical.
Step 4: Installing Top Rail and Tension Wire
Top Rail
Top rail comes in 10-foot-6-inch or 21-foot lengths. The extra 6 inches on the 10-foot sections provides the overlap needed where two rails join inside a sleeve fitting (rail coupling). Start at one terminal post and work toward the other.
Attach a rail end fitting to the end of the first rail section. Insert the rail end into the brace band on the terminal post and tighten the brace band bolt. The rail should sit in the brace band with the open end facing away from the post.
Slide the rail through the loop caps on each line post. At the junction between two rail sections, the end of the next rail slides into the open end of the previous rail, overlapping approximately 4-6 inches. Some systems use a separate rail sleeve (a short piece of larger-diameter pipe) as a coupler. Either method works. The goal is a continuous, smooth rail from terminal post to terminal post.
At the far terminal post, cut the rail to length so it extends into the brace band fitting with 1-2 inches of engagement. Cut with a pipe cutter for a clean, burr-free end. A hacksaw works but leaves burrs that should be filed smooth. Attach the rail end fitting and secure it in the brace band.
At corners, the top rail does not bend. Two separate rail sections meet at the corner terminal post. Each rail has its own rail end fitting inserted into its own brace band on the corner post. The two rails butt against each other inside the post's fittings.
Tension Wire (Optional but Recommended)
A tension wire runs along the bottom of the fence, typically 2 inches above grade. It prevents the bottom of the chain link fabric from being lifted, pushed, or pulled under. For residential pet containment and security applications, tension wire is strongly recommended. For basic boundary fencing where bottom security is not critical, it is optional.
Use 7-gauge galvanized wire or 6-gauge aluminum wire. Attach one end to a terminal post using a tension wire clip or by wrapping around the post and securing with 2 wire ties. Pull the wire taut along the fence line to the next terminal post. Use a fence wire tightener or turnbuckle to apply tension (approximately 200-300 pounds of pull). Secure to each line post with a wire tie to prevent lateral movement. The wire should be tight enough to resist a 50-pound downward force without deflecting more than 1 inch at mid-span between posts.
Step 5: Stretching and Attaching the Fabric
This is the step that defines the quality of your installation. Loose fabric looks amateur and sags over time. Over-tensioned fabric pulls posts inward and creates a concave line. The target is a uniformly taut mesh with slight spring-back when pushed.
Unrolling the Fabric
Stand the roll of chain link fabric upright at one terminal post. Unroll along the outside of the fence line (the side away from your property), letting the fabric lean against the posts and top rail. Do not drag the fabric across the ground, as this can damage the galvanizing. Unroll enough fabric to reach the next terminal post plus 2-3 feet of excess.
Attaching the Starting End
At the first terminal post, weave a tension bar through the end row of the chain link diamonds. The tension bar should be 2 inches shorter than the fence fabric height (a 46-inch bar for 48-inch fabric). Slide the tension bar into the tension bands on the terminal post, with the flat face of the bar against the post. Tighten the tension band bolts. The fabric is now anchored to the starting terminal post.
Stretching with a Come-Along
At the opposite terminal post, weave a second tension bar through the fabric approximately 3-4 feet past where the fabric will terminate. Hook the come-along (fence stretcher) to this tension bar. Attach the other end of the come-along to the terminal post, as low on the post as possible for maximum leverage.
Crank the come-along to take up slack. Watch the fabric as you tension it. You are looking for three indicators of correct tension:
- Diamond shape: The diamonds should be slightly elongated vertically (taller than wide). If the diamonds are square, the fabric is under-tensioned. If the diamonds are dramatically taller than wide (stretched more than 1/4 inch from square), you are over-tensioning.
- Sag test: Push the fabric inward at a point midway between two posts. It should deflect 1-2 inches under moderate hand pressure and spring back immediately. If it deflects 3+ inches, add tension. If it barely moves, reduce tension.
- Knuckle test: Grab the fabric at any point and squeeze. The knuckles (twisted wire ends at top and bottom) should be firm but not rigid. You should not be able to rotate a knuckle by hand. If you can, the fabric needs more tension.
Once the fabric is at correct tension, weave a tension bar through the mesh at the exact point where the fabric meets the terminal post. Remove the excess fabric by opening a single strand of wire (unweaving it from the mesh) at the tension bar location. This separates the stretched fabric from the excess. Slide the tension bar into the tension bands on the terminal post and tighten.
Release the come-along. The fabric should remain taut without any visible sag between posts.
Tie Wire Attachment
With the fabric stretched and anchored at both terminal posts, attach it to the top rail and line posts using aluminum tie wires (also called fence ties). Tie wire goes:
- Top rail: Every 24 inches along the top rail, loop a tie wire around the top rail and through the fabric, then twist the wire 3-4 full turns with fence pliers. Some contractors use every 18 inches for a tighter attachment. Either spacing works for residential; 18 inches is better for commercial or high-wind areas.
- Line posts: 3 tie wires per line post for 4-foot fence, 4 for 6-foot fence. Space them evenly from top to bottom. Loop around the post and through the fabric, twist 3-4 turns.
- Bottom tension wire: If installed, tie the fabric to the tension wire every 24 inches using hog rings or tie wires.
A tie wire spinner tool speeds this process considerably. Without a spinner, tying 100 feet of 4-foot fence takes approximately 45-60 minutes. With a spinner, 25-35 minutes. Over a full day of fencing, that time savings adds up to an extra 30-50 feet of installed fence.
Step 6: Gate Installation
Gates are installed after the fabric is stretched and tied. The gate posts are already set as terminal posts in Step 3.
Walk Gate (Single Swing)
A standard walk gate frame is pre-assembled to the specified opening width (typically 42 inches for a 3-foot clear opening, or 48 inches for a 3.5-foot clear opening). The frame is welded 1-5/8-inch tubing with chain link mesh already stretched and attached at the factory.
Attach the hinges to the gate frame first, then hold the gate in the opening and mark the hinge locations on the gate post. The bottom of the gate should clear the ground by 2-3 inches. Bolt the hinges to the post. Check swing clearance: the gate should swing freely through its full arc (90-180 degrees, depending on design) without dragging or hitting the fabric on adjacent sections.
Install the latch on the opposite post. Standard chain link gate latches are fork-style or kennel-style. Fork latches are the most common for residential: a forked bar drops over a strike plate on the post. Adjust the latch so the gate closes snugly without forcing. A gate that requires pushing to latch will not be latched by the homeowner after the first week.
For pool barrier applications, install self-closing hinges and a self-latching mechanism with a release height of 54 inches on the pool side. See the pool fence code requirements in our chain link fence product guide for details.
Double Drive Gate (Vehicle Access)
Double drive gates have two leaves that meet at the center of the opening. One leaf is the active leaf (opens and closes regularly), and the other is the inactive leaf (secured by a drop rod and opened only when wide access is needed).
Install the inactive leaf first. Attach hinges to the frame and post. Install the drop rod (cane bolt) at the bottom center of the inactive leaf. Drill or chisel a hole in the ground (or set a receiver pipe in concrete) to accept the drop rod. Close the inactive leaf and drop the rod. This leaf is now your fixed reference point.
Install the active leaf on the opposite post. Adjust hinges so the two leaves meet with a 1/2-inch gap at center. Install the latch so the active leaf latches to the inactive leaf. A center latch with a chain drop is the standard hardware for residential double drive gates.
For vehicle gates wider than 12 feet, install a center support post with a ground sleeve. The center post prevents gate sag and top rail deflection over the wide opening. Remove the center post when both leaves are open.
Step 7: Common Mistakes and How to Avoid Them
Mistake 1: Inconsistent Post Depth
If one line post is set at 24 inches and the next at 30 inches, the top rail will show a visible dip between them. The fix is simple: use a depth gauge (a piece of rebar or pipe cut to your target depth) and check every hole before setting the post. A 1-inch variation in depth is acceptable. More than 2 inches is visible to the naked eye at 20 feet.
Mistake 2: Not Crowning the Concrete
Flat or concave concrete footings trap water against the post at the ground line. This is the #1 corrosion point on a chain link fence. Water sits in the pocket, wicks into the gap between concrete and post, and corrodes the galvanizing from the inside out. Crown every footing with a 15-20-degree slope away from the post. It takes 30 extra seconds per post and adds years of service life.
Mistake 3: Over-Stretching the Fabric
Over-stretched chain link pulls the line posts inward, creating a concave fence line. It also puts constant tension on the terminal post footings, which can cause them to lean over time. The diamond shape test is your safeguard: if the diamonds are visibly elongated (more than 1/4 inch taller than wide), you have gone too far. Back off the come-along 2-3 clicks and re-check.
Mistake 4: Skipping the Gravel Base
Setting posts directly on soil at the bottom of the hole allows water to pool beneath the concrete footing. In freeze-thaw climates, that water expands and can lift the footing 1-2 inches per winter, a process called frost heave. Three inches of compacted pea gravel at the bottom of every hole provides drainage and breaks the capillary action that draws water upward. Cost: approximately $0.25 per post hole. Value: prevents $200-$500 in post-resetting labor per heaved post.
Mistake 5: Incorrect Tension Bar Placement
The tension bar must weave through every single diamond in the end row of the fabric. Skipping diamonds (weaving through every other one) is a shortcut that weakens the connection by 50%. Under tension, the fabric will pull away from the skipped diamonds and create a wavy, uneven edge at the terminal post. Take the extra 2 minutes to weave through every diamond.
Mistake 6: Not Accounting for Grade Changes
On sloped terrain, the fabric must follow the grade while the posts remain plumb. If you stretch the fabric straight across a grade change, the bottom of the fabric will lift off the ground on the uphill side, leaving a gap that pets and children can crawl under. The solution: rack the fabric (angle it) to follow the slope. Chain link mesh can rack up to approximately 15 degrees before the diamonds distort visibly. For steeper slopes, step the fence (install level sections with posts set at different heights) and fill the triangular gaps at grade transitions with cut sections of fabric.
Mistake 7: Loose Tie Wires
Tie wires that are not twisted tightly enough will loosen over time, allowing the fabric to pull away from the top rail and line posts. Twist each tie wire a minimum of 3 full turns. Four turns is better. Bend the twisted end flat against the post or rail to prevent it from snagging clothing or skin. Inspect your tie wires before you leave the job: push on the fabric next to each line post and confirm the ties hold firm.
Mistake 8: Forgetting the Tension Wire
Without a bottom tension wire, the chain link fabric is held at the bottom only by its own weight. Over time, the bottom edge lifts, sags, and bows. Dogs push under it. Wind catches it. Ground settling opens gaps. A bottom tension wire costs approximately $0.30-$0.50 per linear foot in materials and 15-20 minutes of labor per 100-foot run. For any residential job where the customer has pets or children, include it in your quote as a standard item, not an add-on.
Adding Privacy and Accessories
Once the chain link fence is installed, consider upselling accessories that increase the project value and improve the customer's experience.
Privacy slats: Woven or inserted into the chain link mesh, slats provide 70-85% visual screening. They are available in colors to match vinyl-coated mesh (green, black, brown, tan, white). Installation time: 15-20 minutes per 10-foot section for a 6-foot fence. Material cost: $3-$7 per linear foot. Markup opportunity: 40-60%.
Bottom rail: A bottom rail provides a rigid lower edge and eliminates the need for a tension wire. It also gives a cleaner, more finished appearance. Bottom rail adds $2-$4 per linear foot in materials and 10-15 minutes per 100-foot section in labor.
Barbed wire or razor ribbon: For commercial and industrial applications, 3-strand barbed wire adds $2-$4 per linear foot. Razor ribbon (concertina wire) adds $4-$8 per linear foot. Both require extension arms mounted to the terminal and line posts. Check local codes: many municipalities prohibit barbed wire and razor ribbon in residential zones.
Vinyl-coated fabric upgrade: If the customer chose galvanized during the quote but wants a color match after seeing the installed fence, you can remove the galvanized fabric and replace it with vinyl-coated fabric in black, green, or brown. The fabric swap takes approximately 60-90 minutes per 100-foot section, plus the cost differential in materials ($2-$5 per linear foot).
Quality Check Before You Leave the Job Site
Walk the fence line before you pack up. Check every item on this list.
- All posts plumb (check with level, not by eye)
- Top rail level between terminal posts (or following grade evenly on slopes)
- Fabric taut, no visible sag between any two posts
- All tie wires twisted tight and bent flat
- Gate(s) swing freely and latch without forcing
- Concrete crowned and sloping away from every post
- No sharp edges, burrs, or protruding wire ends at fabric cuts
- Post caps on every terminal and line post
- Tension bars woven through every diamond at terminal posts
- Bottom gap consistent (2 inches or less if the job is a pet enclosure or pool barrier)
- Clean site: no leftover concrete, tie wire scraps, or fabric pieces on the ground
A 5-minute walk-through catches problems that cost 2 hours to fix on a return trip. Make it a habit on every single job.
Materials Needed Per 100 Linear Feet by Fence Height
Use this reference table for quick estimating. Numbers assume 10-foot line post spacing, 2 terminal posts (end-to-end run, no corners, no gates). Add materials for corners (1 terminal post + fittings per corner) and gates (2 terminal posts + gate frame + hardware per gate) as needed.
| Material | 4 ft Residential | 6 ft Residential | 6 ft Commercial | 8 ft Commercial |
|---|---|---|---|---|
| Terminal posts | 2 (2-3/8" x 7') | 2 (2-3/8" x 9') | 2 (2-7/8" x 9') | 2 (2-7/8" x 12') |
| Line posts | 9 (1-5/8" x 6.5') | 9 (2" x 8') | 9 (2-3/8" x 8.5') | 12 (2-3/8" x 10.5') at 8' spacing |
| Top rail | 105 LF (1-3/8") | 105 LF (1-3/8") | 105 LF (1-5/8") | 105 LF (1-5/8") |
| Chain link fabric | 100 LF x 48" (11 ga) | 100 LF x 72" (11 ga) | 100 LF x 72" (9 ga) | 100 LF x 96" (9 ga) |
| Tension bars | 2 (46") | 2 (70") | 2 (70") | 2 (94") |
| Tension bands | 6 | 8 | 8 | 10 |
| Brace bands | 4 | 4 | 4 | 6 |
| Loop caps | 9 | 9 | 9 | 12 |
| Rail ends | 4 | 4 | 4 | 4 |
| Post caps | 11 | 11 | 11 | 14 |
| Tie wires | ~100 | ~140 | ~140 | ~200 |
| Concrete (60 lb bags) | 22 | 33 | 33 | 50 |
| Bottom tension wire | 105 LF (optional) | 105 LF (recommended) | 105 LF (standard) | 105 LF (standard) |
| Estimated material weight | ~1,200 lbs | ~1,800 lbs | ~2,200 lbs | ~3,000 lbs |
Frequently Asked Questions
How deep should chain link fence posts be set?
Terminal posts (end, corner, gate) should be set 30-36 inches deep for residential fences 4-6 feet tall, and 42 inches deep for 8-foot commercial fences. Line posts can be 2-6 inches shallower than terminal posts. Always add 3 inches of compacted gravel below the concrete footing for drainage. In frost-prone climates, set posts below the frost line (typically 36-48 inches depending on your USDA zone) to prevent heaving.
How many bags of concrete per fence post?
For a standard residential chain link line post (1-5/8" diameter, 6-8" hole, 24-30" deep), 1.5 to 2 bags of 60-pound concrete mix fills the hole with proper crowning. Terminal posts in larger holes (8-12" diameter, 30-36" deep) require 2-3 bags each. A 100-linear-foot residential fence with 11 posts typically needs 22-33 bags total. Buy 10% extra to account for larger-than-planned holes and soil conditions that absorb moisture from the mix.
Can I install chain link fence on a slope?
Yes. Chain link mesh can be racked (angled diagonally) to follow slopes up to approximately 15 degrees without visible distortion of the diamond pattern. For steeper grades, step the fence by installing level sections at different heights and filling the triangular gap at each step with a cut piece of fabric. Keep all posts plumb regardless of slope. The top rail follows the grade between terminal posts, creating a uniform slope along the fence line.
How long does chain link fence installation take?
A 2-person crew can install approximately 100-150 linear feet of 4-foot residential chain link fence per day on flat terrain, including post setting, concrete, top rail, fabric stretching, and tie wire. Six-foot fence reduces output to 80-120 linear feet per day due to heavier fabric, larger post holes, and additional tie wires. Add 30-90 minutes per gate. Sloped terrain reduces daily output by 20-30% depending on severity.
What gauge wire should I use for residential vs. commercial chain link?
Residential chain link uses 11-gauge or 11-1/2-gauge galvanized wire. This produces a fabric weight of approximately 0.85-1.0 pounds per square foot. Commercial and industrial applications use 9-gauge wire, which weighs approximately 1.4 pounds per square foot and provides significantly greater impact resistance and rigidity. For high-security applications, 6-gauge wire is available but requires heavier posts (2-7/8" or 3" terminal posts) and stronger tension hardware to handle the increased fabric weight and stiffness.